![Rogo logo - full colour without Eintech@2x.png]](https://help-guide.eintech.com/hs-fs/hubfs/Rogo%20eintech%20design%20toolkit/Rogo%20Logos/Rogo%20logo%20-%20full%20colour%20without%20Eintech@2x.png?height=50&name=Rogo%20logo%20-%20full%20colour%20without%20Eintech@2x.png)
LTI Setup
Rogo
- Access the site as an admin user with sufficient privileges, and navigate to ‘<portalURL>/Admin/LTI’ e.g.

- If using LTI 1.1 would only need to configure the Secret as per the configuration in the LTI consumer. If this field is left empty, then Rogo will not be available for LTI 1.1 connections.
- If using LTI Advantage/LTI 1.3 then all the fields lower in the page are necessary to fill in. Find below examples of what this may look like on your side, we provide here examples from Brightspace integrations, but your LMS tool/software provider should be able to advise on values for these:
- Access Token URL: “https://auth.brightspace.com/core/connect/token”
- Authorize URL: “https://<subdomain>.brightspace.com/d2l/lti/authenticate”
- Issuer: “https://<subdomain>.brightspace.com”
- Jwk Set URL: “https://<subdomain>.brightspace.com/d2l/.well-known/jwks”
- Cient ID: “00000000-0000-0000-0000-000000000000”
LTI Consumer Setup
LTI 1.1 Tool Provider
- In your LMS platform navigate to the area where Tool Providers are configured. In Brightspace this is under ‘External Learning Tools’ > ‘Manage Tool Providers (Legacy)’.
- Start the process of creating a new tool provider, there may be some variation to the naming of the fields but likely similar fields to the following will be available and need to be completed:
-
Launch Point: “https://<subdomain>.rogoserver.com/services/lti/launch.ashx”
-
Version: “1.1”
-
OAuth Signature Method: “HMAC-SHA1”
-
Secret: The same value as configured in Rogo
-
Checkbox labelled “Use custom tool consumer information instead of default”: Checked
-
Key: Optional
-
Name: Optional
-
Description: Optional
-
Contact Email: Optional
-
Checkbox labelled “Allow users to use this tool provider”: Checked
-
Security Settings:
-
Send tool consumer information to tool provider: Checked
-
Send context information to tool provider: Checked
-
Send course information to tool provider: Checked
-
Send course section information to tool provider: Not Checked
-
Send LTI user ID and LTI role list to tool provider: Checked
-
Send user name to tool provider: Checked
-
Send user email to tool provider: Checked
-
Send system Org Defined ID to tool provider: Checked
-
Send link title to tool provider: Checked
-
-
Send link description to tool provider: Checked Any additional configuration within the LMS in relation to organisation units: as per your requirements
-
LTI Advantage
Registration Creation
Fields to complete with example values:
- Name: Free entry
- Description: Free entry
- Domain: “https://<subdomain>.rogoserver.com”
- Redirect URLs:
- https://<subdomain>.rogoserver.com/signin-oidc
- https://id.rogoserver.com/connect/authorize
- https://id.rogoserver.com/LtiAutologin
- https://<subdomain>.rogoserver.com/services/lti/1.3/launch.ashx
- OpenID Connection Login URL: “https://<subdomain>.rogoserver.com/services/lti/1.3/OidcLogin.ashx”
- Target Link URI: Empty
- Keyset URL: “https://<subdomain>.rogoserver.com/services/lti/1.3/PublicKeys.ashx”
- Extensions:
- Assignment and Grade Services: Checked
-
Deep Linking: Not Checked
-
Names and Role Provisioning Services: Not Checked
-
Platform Notification Service: Not Checked
- Roles:
- Send Institution Roles: Checked
- Substitution Parameters: None configured
- Custom Parameters: None configured
In Brightspace on this page are also the values that you can use to fill in Rogo’s side of LTI Advantage configuration, ClientId etc.
Create Deployment
Fields to complete with example values:
- Name: Free entry
- Description: Free entry
- Extensions:
-
Assignment and Grade Services: Checked
-
Deep Linking: Unchecked
-
NAmes and Role Provisioning Services: Unchecked
-
Platform Notification Service: Unchecked
-
Context Copy Notice: Unchecked
-
- Security Settings:
- Anonymous: Not Checked
- Org Unit Information: Checked
- User Information: Checked
- Name: Checked
- First Name: Checked
- Middle Name: Checked
- Last Name: Checked
- Email: Checked
- User ID: Checked
- Username: Checked
- Org Defined Id: Checked
- Link Information: Checked
- Title: Checked
- Description: Checked
- Classlist including users not known to this deployment: Not Checked
- Configuration Settings:
- Open as External Resource: Not Checked
- Grades created by LTI will be included in Final Grade: Not Checked
- Auto Create Grade Items: Not Checked
- Substitution Parameters: None configured
LTI Links
LTI Consumer Documentation
LTI Links are the content types with which candidates or admin users will link over to the LTI Provider. The specific setup of these will be different depending on the specific tool that you use. Please find below some links to common LTI Consumer platform’s documentation.
- Brightspace - They only provide instructions for specific LTI Providers, so actions will need to be adapted for configurations in earlier sections of this document.
Context Id
Rogo will use the LTI Context Id to define a Course Group in Rogo’s system for the below requests.
Rogo Custom Parameters
For linking to content curated in Rogo and communicating to the Rogo Platform what kind of link you want to create we leverage custom parameters. Find details below about the supported ‘actions’ and additional information about how to map identifiers between Rogo and the LTI Consumer.
Actions
By setting ‘action=<value>’ to the following values, you can configure what kind of function is being routed through for the user
- ‘action=exercise_attempt’
- Additionally requires ‘exercise_id=<value>’ or see later section for “Exercise code”.
- For admin users:
- Routes to the PaperVersion administration page for the linked resource
- For candidate users:
- Routes to the first page of the linked assessment. This is either the welcome screen if configured, or the first screen of the assessment.
- ‘action=course_results’
- For admin users:
- Routes to Course Group Gradebook
- For candidate users:
- Routes to Course Group results page, or a message to indicate no tests have been completed yet
- For admin users:
- ‘action=tutor_gradebook’
- Additionally requires ‘course_id=<value>’
- For admin users:
- Routes to Course Group Gradebook
- For candidate users:
- Shows a message indicating user is not a tutor
- ‘action=results’
- Routes to the ‘My Results’ page for the given user
Retrieving Rogo Resources Ids
For actions that have an additional requirement, these need to be retrieved from, or configured in, Rogo. Find specific details below:
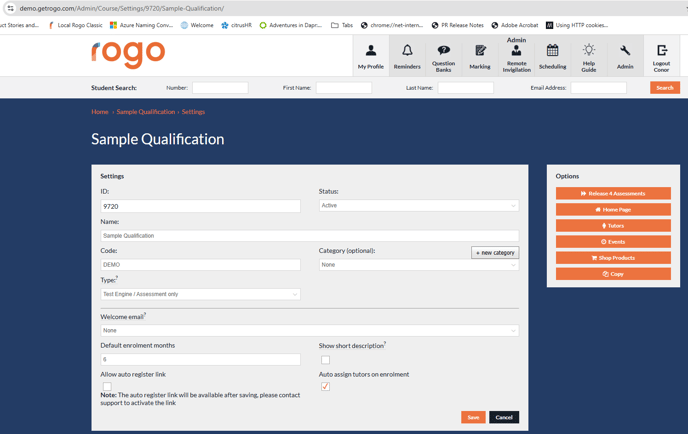
Course Id
Navigate to a Course Resource in Rogo, then click through to the Course settings.The value you are looking for here is “ID”, as seen in the top left in the below screenshot.
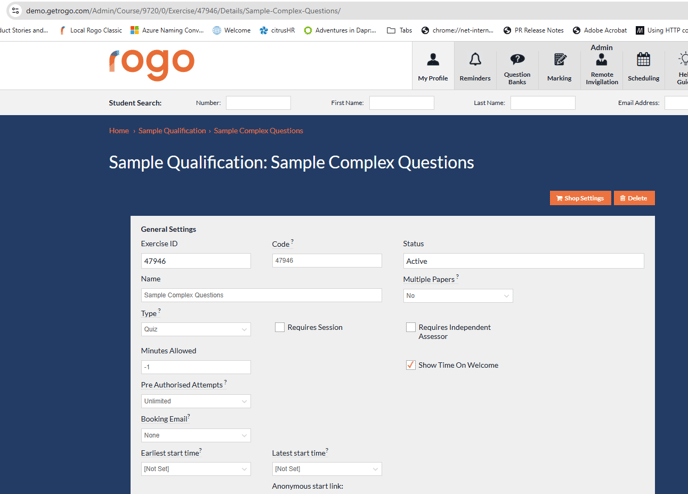
Exercise Id
Navigate to an Exercise Resource in Rogo, then click through to the Exercise Settings.
The value you are looking for here is “Exercise ID”. Rogo supports configurable language for Courses and Exercises, if your portal has customised this language, then you will be looking for “<ExerciseName> ID” however when entering in as a custom parameter for the LTI Link you must reference this as “exercise_id”.
‘Exercise’ Code
To better reflect and match into your systems, Rogo supports user-configurable codes to represent the Exercise in the platform – these could be used to match IDs in your LMS platform rather than requiring a dictionary mapping between the resource IDs.
This can be used in the “exercise_attempt” action to allow for seamless LTI Links between the platforms. To configure or view these, you navigate to the Exercise Settings screen as per instructions in ‘Exercise Id’ retrieval above, and the field is labelled “Code”.
When entering the “Exercise Code” as a parameter in the LTI Link, you must use the portal configured language for Exercise rather. For example if the Rogo portal has configured ‘Unit’ as the nomenclature for Exercises, you would create a Custom Parameter “unit_code=<value>”.
NOTE: This differs from “exercise_id” where you must not ‘translate’ to client configurable language.